Some of the links in this post may be affiliate links.
Many people don’t realize that repotting orchids is a very necessary thing to do in order for your plant to remain healthy! In this post I show you exactly how to repot an orchid.

Most people don’t realize that they need to repot, let alone know how to repot an orchid. Let me subtly say…YOU NEED TO. Keep reading, and I will show you a pictorial overview on how to repot orchids at home.
In specific, how to repot Phalaenopsis orchids in bark. Whether your moth orchid is growing in a bark mix or in sphagnum moss, it will need to be repotted every year or two.
I personally don’t do it every year. Every other year would be a good rule of thumb. But never repotting is not an option!
Table of Contents
Why Repot Your Moth Orchid?
Why do you need to repot your moth orchid? Well, the potting medium will start to break down and the orchid roots will not be able to get the air and nutrients they need.
Remember, moth orchids are epiphytes, meaning they grow ON other plants like trees in nature and they have a lot of air circulation.
How to Repot an Orchid
The best time to repot a moth orchid is right after it is done flowering and you cut the bloom spike off. In order to repot your moth orchid, you’ll need a few supplies: potting media (I use bark mix instead of sphagnum moss), clean pots, a bucket, and scissors.

In the photo above, I have used the Hoffman Special Orchid Mix as the potting medium for my moth orchids. I found that the bark chunks are too big for my climate. It would be more suitable for greenhouse growing or if you live in a humid climate.
I have since switched to the Miracle Gro potting mix for orchids. I like this one much better and is easier to work with. It doesn’t dry out as rapidly as the Hoffman mix, but rapidly enough.
To this mix, I like to add a bit of activated charcoal and a little bit of sphagnum moss to hold in a little moisture since bark mix can dry out very quickly!
This will help to remove impurities and excess minerals from tap water and fertilizer salts as well. It will go a long way to ensure your orchids are happy!
Repotting in Orchid Bark
The first thing you need to do is to dump the bark mix into a bucket of water and soak in hot water.

Let the bark mix soak for about a half hour. The reason you want to do this is so you can properly hydrate the bark so it will more easily accept water. The bark needs some help to get started.
Clean Up Your Roots
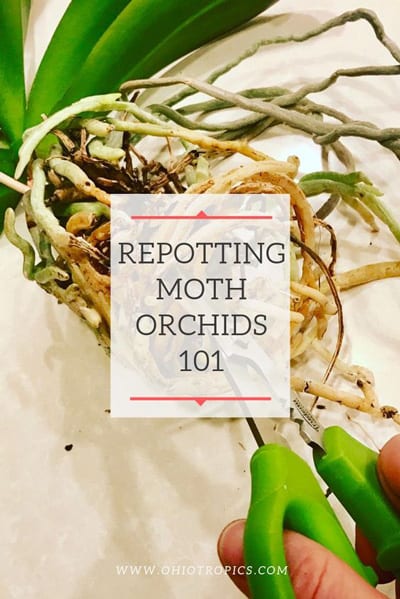
As your bark mix is soaking, gently take your orchid out of its pot, remove all the bark off the roots carefully, and you’ll need to cut off any dead roots.

And don’t worry! You are not harming your plant! Orchids are tough. Tougher than you think. Notice in the picture above, I’ve already cleared out all the old bark, and I’m cutting off the dead roots.
Take a pair of scissors (preferably sterilized with alcohol or in a flame), and cut off any dead roots.
You’ll know they’re dead because they may be hollow or squishy, or maybe they are completely dried up. The roots that are alive will be firm and plump.
Place Your Orchid In a New Pot
Next, take your orchid that you’ve cleaned up and select a pot just big enough that the roots fit in. I ordered some clear orchid pots on Amazon.
I like clear plastic pots because I can easily look at the roots and monitor the health of the root system. You can quickly see if anything is going wrong.

In the picture above, I carefully placed my orchid in the pot. Try not and harm any of the roots, but it’s no big deal if you do. As long as the majority of them are unharmed.
After this, take the bark mix that has been soaking in the hot water for half hour, scoop some with your hand, and place it in the pot a little at a time.
You’re going to have to gently use your fingers to pack the bark mix in the pot. Sometimes I use a thin bamboo stick to push the bark mix in. Just be gentle and try not and break any roots.
Move as much bark as you can fit in between all the roots. If needed, before you put the plant in the pot, you can put some bark mix at the bottom too if there is room. Just make sure the plant is stable and not coming out of the pot.

And voila! You’ve now repotted your orchid. Give your orchid a good soaking of water in your sink, and place it back on your window.
I also repotted a small mini-cattleya orchid (pictured in the middle above). Lastly, slip your plastic pot inside a more decorative pot to add your finishing touch. Now let nature do its thing!
If you’d rather watch a video on how to do this, I created a YouTube video where I also include additional tips! Take a look!
For more information on how to care for your moth orchid, you can read my general growing tips on moth orchids, and also read about how to care for your orchid after it is done blooming.
Lastly, my eBook, Moth Orchid Mastery, has helped thousands of people with orchid culture. It contains practically all my knowledge on moth orchids, and I know that it will make you a successful grower!
Do you have any moth orchids at home? Comment below!
Mark
Monday 6th of November 2023
Great video! I just found your site and am just scratching the surface, it's very helpful. Maybe I missed it, but it would be helpful to know a bit more about adding activated charcoal - how much per orchid, how to mix it in. Also, please know that some of your affiliated links connect to unavailable products or show page not found.
I'm off to repot my first orchid (bark only this time)! Wish me luck
Raffaele
Monday 6th of November 2023
Glad you enjoyed the post, the video, and my site Mark! For the activated charcoal (it is by no means 100% necessary but it can help), I don't have a strict amount that I add. But you don't need a lot. Roughly a quarter to half a part of charcoal to 4 parts of the bark mix or so should be good! Adding a little sphagnum moss to the bark mix will help retain a little more moisture too. It's not necessary, but it can help retain moisture. As long as you water properly, many different mixes will work, but you just have to adjust depending on your growing conditions. Moth orchids don't like their potting mixes to go completely dry. 100% bark mixes will dry out quicker, so adding a little sphagnum may be a good idea if you have your plant growing in plenty of light and warm conditions. Let me know if you have anymore questions, and thank you for letting me know about the affiliate links!
Kim leboeuf
Sunday 23rd of July 2023
I’m a beginner with orchid plants. You have helped me out and I am looking forward to seeing all your work. You are one of the most down to earth teacher for me. Thank you.
Raffaele
Monday 24th of July 2023
I'm so happy to hear that Kim! Good luck!
Maya
Sunday 11th of December 2022
Hello! How long should we soak them after repotting? And also how much of the activated charcoal do you mix in with the bark?
Raffaele
Monday 12th of December 2022
Since you've already soaked the bark mix, you can just stream some water through after repotting. Just a few people of activated charcoal would work, unless you mix already includes it!
Cathy
Monday 15th of August 2022
Excellent video! I am excited to repot one from a friend who ALSO MOVED and one as a gift. Ages are over 5 years and probably 1-2 yrs old. So it is time to repot both. Thank you!
Raffaele
Wednesday 17th of August 2022
You're very welcome Cathy!
Naomi Grant
Thursday 28th of July 2022
I had an moth orchid bought for me when my husband died I call her Ophelia I cut the spikes off after the flowers died I do not know what the store puts it in the pot as a medium but I did not clear it out off the roots. I am using bark now. Should I take it back out and clear the roots or am I ok? I already have another leaf growing and it seems healthy. I bought your book but I didn't see the part about clearing the roots until to late. Is it to late with a new leaf growing? And why does everyone keep the roots crushed together? They are not that way in nature.